Explained
Under-Desk Keyboard Trays, Explained
After reading this you will know which keyboard trays can physically mount to your desk, and which ones are worth mounting.
In this guide
An under-desk keyboard tray moves your keyboard below the desktop so your forearms can drop and your wrists can straighten. The category looks simple, and then people order a tray, get under the desk with a screwdriver, and discover a drawer box or a steel cross beam sitting exactly where the mounting plate needs to go. The two things that decide this purchase are whether the tray can attach to your specific desk and whether it tilts once it is there.
The 30-second version
- Mounting is the whole decision. Before you compare tilt ranges or platform sizes, get under your desk with a tape measure and find out what will physically attach.
- Negative tilt is the point of a tray. Tipping the front edge up and the back edge down is what keeps wrists closer to neutral; a tray that only sits flat has just relocated your keyboard.
- Clamp-on trays trade rigidity for reversibility. They avoid drilling, which matters in a rental, but owner reports across the category are dominated by clamps loosening and screws backing out over months.
- Track length decides whether it disappears. A short track means the tray protrudes under the desk edge when stowed, so you knock your knees on it and lose the desktop above it anyway.
- The mouse has to ride on the tray. If your hand still travels up to the desktop for the mouse, you have kept the shoulder reach the tray was supposed to remove.
The products this guide is about
Our verdict on each, with the full reasoning on the companion review.
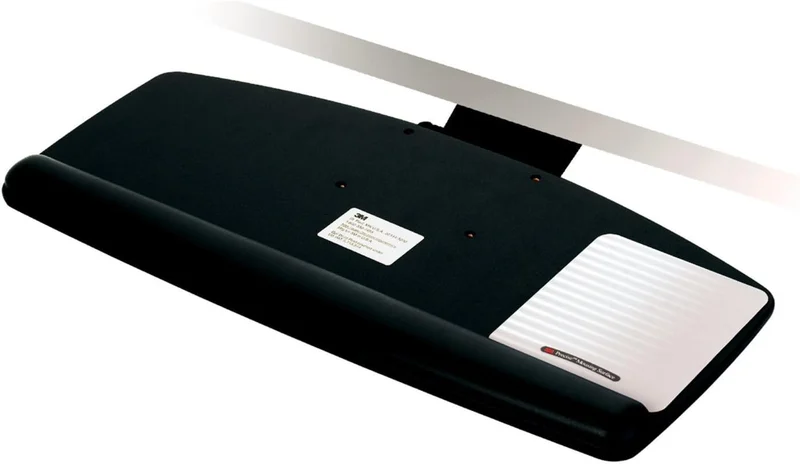
- Buy 3M Adjustable Keyboard Tray AKT90LE The reference under-desk tray: a lift-to-set arm with printed height and tilt scales, 15 degrees of negative tilt, and a 23 inch track that swallows it whole. Amazon
- Buy HUANUO Under Desk Keyboard Tray for Flat Bottom and Cross Beam Desks The tray that mounts to a standing desk frame, with bracket hardware for cross beams and more negative tilt than anything else here. Amazon
- It depends VIVO Large Clamp-on Keyboard and Mouse Tray (MOUNT-KB05E) The no-drilling answer for rentals and desks you will not put screws into, as long as you accept a tray that only sits flat. Amazon
- Skip Kensington Underdesk Basic Keyboard Drawer (K60009US) A plastic drawer that still wants holes in your desk but adjusts in no direction and leaves your mouse up on the desktop. Amazon
What actually matters
- Mounting method. Screw-mounted trays attach to a flat, solid underside and stay put. Clamp-on trays grip the front edge of the desktop with C-clamps and leave no holes. Bracket kits bridge over an obstruction such as a standing desk cross beam. Which of these your desk allows narrows the field before any other spec matters.
- Negative tilt range. Somewhere around 10 to 20 degrees of front-edge-up angle is the ergonomic reason to install a tray at all. Check that the number quoted is the downward, or negative, figure and not just a positive incline for a stand.
- Desk thickness and clear span. Clamps typically want a top somewhere between half an inch and an inch and a quarter, which rules out thick butcher block and some sit-stand tops. Screw mounts want enough material to hold wood screws without the tips coming through the surface.
- Unobstructed depth under the desk. The mounting track needs a clear run of flat material behind the front edge. A long track needs a lot of it. Drawer boxes, decorative aprons, modesty panels, and steel cross beams all disqualify a mounting spot.
- Platform stiffness and size. Wood and thick steel platforms resist the bounce that makes typing feel spongy. Thin plastic transmits every keystroke. Depth matters more than width once you add an attached wrist rest, and width matters if the mouse shares the board.
- Height adjustment. A fixed-height tray commits you to whatever position you picked at install time. An adjustable arm lets you tune the drop for your chair, your keyboard height, and whether you are sitting or standing.
- Vertical clearance for your keyboard. Tall mechanical boards and sculpted split keyboards need more room between the platform and the underside of the desk than a slim membrane board, so check the clearance before you order.
The specs, in plain English
Green flags vs red flags
Green flags
- A stated negative tilt figure in the range of roughly 10 to 20 degrees, with a knob or lever to set it
- Printed height and tilt scales on the arm, so a position you like is repeatable after you bump it
- A wood or thick steel platform rather than a thin molded plastic sheet
- A track long enough to stow the platform fully under the desk, paired with clearly stated depth requirements
- A dedicated mousing surface, ideally mountable on either side
- A long warranty on the arm specifically, which is the part that wears
Red flags
- No tilt adjustment at all; you are buying a drawer, not ergonomics
- A screw-in mount with no adjustability after installation, which takes the holes and gives nothing back
- Vague or missing desk requirements in the listing, with no thickness, depth, or clear-width numbers
- Owner reports clustering around clamps loosening, screws backing out, or platforms flexing while typing
- No mouse space on the platform, so your hand goes back up to the desktop constantly
- Weight capacity or clearance so tight that sculpted ergonomic keyboards and vertical mice are ruled out
Who's who: the brands
- 3M - The reference point for adjustable trays in offices, known for lift-to-set arms with printed scales and long warranties on the mechanism.
- HUANUO - Value-focused mounting specialist; the brand to look at when a standing desk cross beam blocks conventional trays, thanks to included bridge brackets.
- VIVO - Broad ergonomics catalog with a strong clamp-on lineup, which makes it the usual answer when drilling is off the table.
- Kensington - Long-running office accessory brand whose tray range runs from simple plastic drawers to more adjustable platforms; the basic models are notably basic.
- Fellowes - Office ergonomics mainstay with widely stocked trays, typically covering the middle of the market on adjustment and build.
- Humanscale - Contract-furniture ergonomics specialist whose trays show up in corporate fitouts; heavy engineering, priced accordingly.
How to read a listing without getting fooled
Start at the bottom of the listing, not the top. The specification block that tells you desktop thickness, minimum depth, minimum clear width, and acceptable materials is the part that decides whether the product is even a candidate, and it is usually buried below the marketing photos. Next, separate the tilt numbers: a range written as 6 degrees up to 22 degrees down is not the same as 22 degrees of adjustment, and some listings quote only the positive figure because there is no negative tilt to quote. Treat track length and extension distance as different measurements; extension is how far the tray comes toward you, track length is how much room the rail needs under your desk. Read platform dimensions as width by depth and mentally subtract the wrist rest from the depth. Photos are worth studying for what is missing: if no image shows a mouse on the tray, there is probably nowhere to put one. Finally, when scanning owner reports, weight the ones written months after installation. Every tray feels solid on day one, and the useful complaints are about clamps creeping, screws backing out, and platforms that developed a bounce.
How much should you spend?
Spend based on the mechanism, because that is where the money goes and where the failures happen. The cheapest trays are fixed plastic drawers that still require drilling into your desk, and they are poor value at any price because they adjust in no direction. Clamp-on trays sit a step up and are worth it only when drilling is genuinely impossible; you are paying for reversibility, not ergonomics, since most of them sit flat. The middle of the market is where the category gets good: this is where you find real negative tilt, several inches of height travel, a slide that stows, and in some cases the bracket hardware that lets the tray mount over a standing desk cross beam. That tier is the value sweet spot for most people. Paying premium buys a stiffer platform, a smoother lift-and-lock arm with printed scales you can dial back to, a dedicated mousing surface, and longer warranty coverage on the arm. That is worth it if you type all day and want to install once and never think about it again. It is not worth it if your desk is shallow enough that the long track will not fit anyway, in which case the constraint, not the budget, is choosing for you.
Questions, answered
Do I really need negative tilt, or is a flat tray fine?
Negative tilt is the reason to mount a tray in the first place. Tipping the front edge up and the back edge down lets your wrists stay closer to neutral rather than bending upward, which is the angle a flat desktop imposes. A tray with no tilt has done one thing: dropped your keyboard a couple of inches and taken away the desk surface that used to be there. If comfort is the goal, insist on tilt. This is general product information rather than medical advice, so if you already have wrist, hand, or nerve symptoms, talk to a professional instead of assuming hardware will resolve it.
How do I check whether a tray will fit my desk?
Get underneath with a tape measure before you order. Measure three things: the depth of flat, solid material behind the front edge, which has to exceed the tray's track length; the width of clear space, since swivelling trays typically want somewhere around 30 to 35 inches; and the thickness of the desktop itself, which matters for both clamps and screw length. Then look for obstructions in the mounting zone: a drawer box, a decorative apron, a modesty panel, or the steel cross beam on an electric sit-stand frame. Any one of those stops a screw-in tray.
Can I put a keyboard tray on a standing desk?
Sometimes, and the frame decides it. Most electric sit-stand desks run a steel cross beam directly under the desktop, right where a tray wants to mount, which rules out conventional screw-in trays. Some trays ship with bridge or spacer brackets made exactly for this, and that hardware is the thing to search for. Also check the desktop: many sit-stand tops are thicker than clamp-on trays can grip, and some are thin enough that mounting screws would come through the surface.
Is a clamp-on tray a good way to avoid drilling?
Only when drilling is genuinely not an option, such as a rental, a glass top, or a desk you do not own. Clamps buy reversibility and pay for it in rigidity, and the recurring themes in owner reports across clamp-on models are clamps working loose and mounting screws backing out over months of use. Most of them also offer no tilt and no height adjustment. A screw-mounted tray puts a handful of small holes in the underside of a desk where nobody will ever see them, and in exchange gives you a mechanism that stays where you set it.
Will a tray work with a mechanical or split ergonomic keyboard?
Check vertical clearance, not just the platform footprint. Tall mechanical boards and sculpted split keyboards need more space between the platform and the underside of the desk than a slim membrane keyboard, and clamp-on trays are the tightest here, so check the clearance before pairing one with a sculpted keyboard or a vertical mouse. If you use a tall keyboard, favour a tray with real height adjustment so you can drop the platform further, and make sure the board is deep enough for the keyboard plus any wrist rest attached to it.
How do I know if the tray is set at the right height?
The usual starting point is elbows at roughly a right angle with your shoulders relaxed, forearms about parallel to the floor, and wrists straight rather than bent up or down. Set your chair first so your feet are supported, then bring the tray to your hands rather than reaching up or down to it. Add a little negative tilt until your wrists stop extending upward. Adjust in small steps over a few days rather than chasing a perfect number on day one, and treat this as general guidance rather than medical advice.
Or jump to the head-to-head: 3M Adjustable Keyboard Tray AKT90LE vs HUANUO Under Desk Keyboard Tray for Flat Bottom and Cross Beam Desks.