Explained
Headlight Restoration Kits, Explained
After reading this you will be able to look at any headlight kit's contents list and tell in ten seconds whether it can actually remove a failed hardcoat and put a lasting UV barrier back on.
In this guide
Cloudy yellow headlights are not dirty. The clear part of the lens is polycarbonate, a plastic that yellows fast in sunlight, so the factory sprays it with a thin UV hardcoat, and after roughly a decade in the weather that coating breaks down and goes chalky. That means restoration is a refinishing job with two halves: abrade the dead coating off, then put a new UV barrier on. Nearly every disappointing result comes from a kit that does the first half and skips the second.
The 30-second version
- The final step is the whole ballgame. A kit that ends in a UV clear coat, a bonded ceramic coating or a UV sealant buys you a year or two; a kit that ends in polish or wax buys you weeks, because sanding leaves bare polycarbonate that yellows faster than the lens did before you touched it.
- Look for grit numbers, plural. Removing a failed hardcoat needs a coarse abrasive followed by progressively finer ones, typically something in the 500 to 800 range to cut and 2000 to 3000 to bring back clarity, so a kit that lists a single all-purpose pad is a polish in restoration packaging.
- Wet means wet. The instructions that say to keep the lens and the disc soaked are not being fussy: water floats away the removed plastic so it does not re-scratch the surface, and it keeps friction heat from melting or hazing the lens.
- Match the kit to how bad the lens actually is. Wet the lens with a cloth and look; if the haze visibly clears while wet, the damage is shallow and a wipe kit will do, and if it still looks milky when soaked, you need real graded abrasives.
- Nothing consumer-grade equals the factory coating. Original hardcoat is sprayed in a clean room and cured under UV lamps, so treat every kit as maintenance you repeat on an interval rather than a permanent repair, and judge kits on how long that interval is.
The products this guide is about
Our verdict on each, with the full reasoning on the companion review.
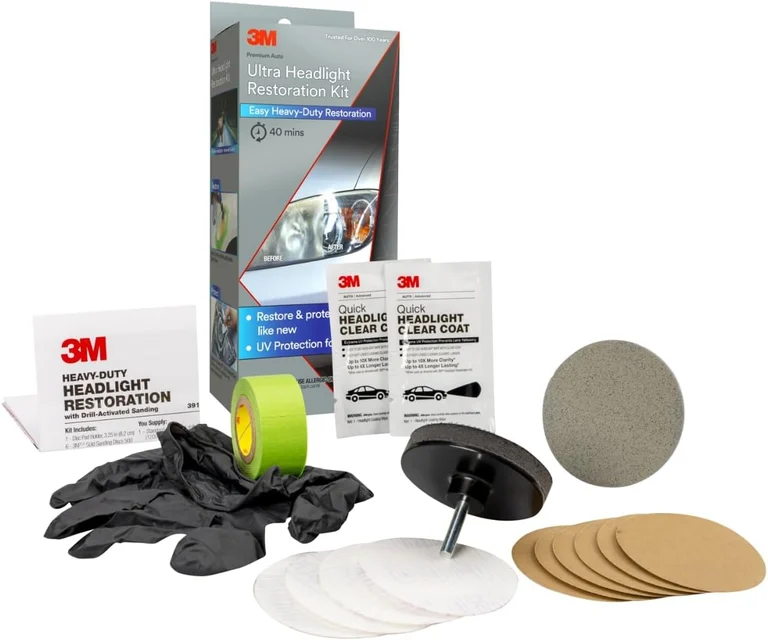
- Buy 3M Ultra Headlight Restoration Kit 39195 The most complete abrasive system you can buy in a consumer box, and it finishes with real clear coat wipes instead of a polish. Amazon
- Buy CERAKOTE Ceramic Headlight Restoration Kit A no-power-tools wipe system that still ends in a genuine ceramic clear coating, which is the step budget kits usually skip. Amazon
- It depends Meguiar's Heavy Duty Headlight Restoration Kit G2980 The best optical clarity of the four on truly neglected lenses, but the protection step is rated at about a year and a corded drill is the expected tool. Amazon
- Skip Turtle Wax Hybrid Solutions Headlight Restoration Kit Pleasant on light haze, but there is not enough abrasive here to remove a failed hardcoat, which is the actual problem on yellowed lenses.
What actually matters
- A genuine UV protection step. Read the contents list for the words clear coat, ceramic coating or UV sealant listed as a separate final product, not a bullet inside the description of a polish. This single distinction separates results measured in years from results measured in weeks, and it is the criterion most buyers never check.
- Graded abrasives rather than one pad. A restoration kit should name at least two, ideally three, grit levels. Coarse grit removes the failed hardcoat, fine grit removes the scratches the coarse grit left, and skipping the middle of that sequence is why some restorations look cloudy up close even though the yellow is gone.
- Whether a drill is required, helpful or unnecessary. Some kits will not perform without a corded drill, particularly ones that use a wool buffing pad, while wipe-based systems are designed for hands only. A drill speeds up a sanding kit, but a cordless one can bog down and overheat under a wool pad.
- Realistic coverage for your vehicle. Most kits contain enough material for two standard headlights. Large wrap-around lenses on trucks, SUVs and vans can run a kit dry before the second lens is finished, and stopping mid-job with a partly sanded lens is worse than not starting.
- A stated protection period or warranty. Makers who publish a duration or back the coating with a guarantee are telling you what they will stand behind. Owner reports typically land a little short of the claim in hot, sunny climates, so read a stated period as an optimistic ceiling rather than a promise.
- Masking supplies and mess tolerance. Wet sanding throws an abrasive slurry across your bumper and polish spatters off a spinning pad, both of which mark paint and trim. Tape in the box is a real convenience, and a wipe-based kit that makes almost no mess is a legitimate reason to accept less cutting power.
- Whether your problem is even fixable from the outside. Sanding and coating touch the outer surface only. Internal fogging, crazed cracking and a lens gone brittle are replacement jobs, and no kit will change that.
The specs, in plain English
Green flags vs red flags
Green flags
- The contents list names a clear coat, ceramic coating or UV sealant as its own final product, with its own applicator or wipe.
- Two or more grit numbers are printed on the box or in the listing, ideally a coarse cutting grit and a fine finishing grit.
- The instructions call for water, a spray bottle or a bucket at the sanding stage, which means the maker expects wet sanding.
- Masking tape is included, a small sign that the maker knows the process makes a mess and expects you to protect the paint.
- A protection period is stated, or a warranty covers the coating, so there is a claim you can hold the maker to.
- Coating wipes come sealed in individual foil sachets, which keeps the chemistry live until the moment you open one.
Red flags
- The last step in the sequence is a polish, compound, restorer or wax, with no protective coating following it.
- The only abrasive is one pad or one cloth, described as working on all levels of oxidation.
- Marketing leans on a very short time claim, restore your headlights in a few minutes, which is achievable only by not removing the failed coating.
- No grit numbers appear anywhere in the listing, the photos or the instructions.
- The product is sold on the strength of a shine, gloss or wet look, with no mention of ultraviolet protection at all.
- Household hacks are suggested as an equivalent, such as toothpaste or bug spray, which strip or soften the surface and leave nothing protecting it.
Who's who: the brands
- 3M - An abrasives manufacturer first, so its consumer kit is built around a graded disc progression and finishes with clear coat wipes rather than polish.
- Cerakote - Coating specialists whose headlight kit is built for people with no power tools, ending in a bonded ceramic coating and backed by a guarantee the maker describes as limited lifetime.
- Meguiar's - A car care brand with deep polishing heritage, so its heavy-duty kit chases optical clarity with drill-driven buffing and expects you to own the tools.
- Turtle Wax - Mass-market car care, widely stocked and easy to use. Its headlight kits favor speed and tidiness over cutting power, which suits maintenance more than rescue.
- Sylvania - A lighting company that also sells headlight restoration kits aimed at first-timers.
- Chemical Guys - Detailing-focused brand with a strong following among enthusiasts, generally selling polishes and coatings as separate products rather than one boxed system.
How to read a listing without getting fooled
Ignore the before-and-after photos entirely, since any polish produces a dramatic one, and read the contents list from the bottom up. Whatever is listed last is what will be protecting your lens a year from now, so if that final item is a polish, a compound or a wax, the kit has no durability story regardless of what the front of the box promises. Next, count the abrasives and look for numbers: two or three grit figures signal a real removal stage, while one pad described as suitable for all conditions signals a surface treatment. Then check what the kit assumes you own, because phrases like drill-powered or requires a power drill are requirements, not suggestions, and wool pads in particular work best on a corded drill. Watch for words doing quiet work in the description: restorer, clarifying and revitalizing all describe abrasives, while protectant, sealant, clear coat and ceramic describe the coating, and a listing that uses only the first group is telling you what it left out. Finally, note the claimed coverage and the claimed protection period, then mentally discount the period a little if your car lives outdoors in strong sun, since owner reports often land shorter than the label in hot climates.
How much should you spend?
This is a category where the cheapest option and the most expensive option are separated by less than the cost of a tank of fuel, so the decision should be about fit, not budget. What drives cost is the number and quality of the abrasives, whether the kit ships a real coating rather than a polish, and how much hardware is in the box such as backing pads, applicators and masking tape. The value sweet spot sits at the bottom of the mid-range, where you get a full grit progression and a clear coat in one box; that is enough for a genuinely yellowed lens and there is little to gain above it. Budget kits are worth it in exactly two situations: your lenses are only lightly hazed, or you have no drill and no water access and need a wipe-based system that still finishes with a real coating. Spending less than that, on a polish-only bottle marketed as a restoration, is the one purchase that reliably wastes money, because you will be doing the job again within a season and will still need to buy abrasives. Spending more makes sense only when you are equipping yourself for repeat work or bigger lenses, where separate professional abrasives and a two-part clear coat give better durability than any boxed kit. And keep the whole category in perspective: even a mid-range kit costs a small fraction of one replacement headlight assembly, so restoration is worth attempting first on almost any lens that is not cracked or fogged internally.
Questions, answered
Can I just polish the lens and skip the clear coat?
You can, and it will look excellent for a few weeks before going downhill faster than before. Polishing removes the remains of the factory UV hardcoat along with the yellowing, which leaves raw polycarbonate facing the sun with nothing in front of it. That plastic is more UV-vulnerable uncoated than it was with a failing coating on top, so polish-only jobs typically haze back within a season. Whatever kit you buy, the last step should be a clear coat, ceramic coating or UV sealant.
What grits do I actually need?
It depends on how bad the lens is. Light haze can often be handled with a fine abrasive alone, in the 2000 to 3000 range, or with a prep wipe. A properly yellowed lens needs to start coarse, somewhere in the 400 to 800 range, to cut through the dead hardcoat, then step through progressively finer grits to erase the scratches that cutting left. The rule is to keep each jump modest; going straight from a coarse grit to a very fine one leaves sanding marks the fine grit cannot reach, which reads as cloudiness in daylight even when the yellow is gone.
Do I need a drill?
Only for some kits. Wipe-based ceramic systems are designed for hands only and work fine in an apartment parking space. Sanding kits go much faster with a drill, cutting the arm work considerably, and kits that use a wool buffing pad are best run on a corded drill because cordless ones can bog down and overheat. If you do use a drill, keep it moving, keep the speed moderate, and keep the lens wet wherever the instructions call for wet sanding, since heat is what melts and distorts polycarbonate.
How long should a restoration last?
Plan on one to two years, not forever. Kits finishing with a stronger clear coat tend to draw longer owner-reported lifespans, while lighter coatings and sealants are more often reported at about a year. Climate and parking dominate the outcome: a garage-kept car in a mild climate can go noticeably longer, and a car parked outside in intense southern sun will come up short of any label claim. No consumer product reproduces the factory hardcoat, so think of this as maintenance on an interval and buy the kit that gives you the longest one.
The haze looks like it is inside the lens. Will a kit help?
No, and there is a quick test. Wipe the outside of the lens with a wet cloth and watch: if the haze visibly clears while the surface is wet, the damage is external and any decent kit will work. If the appearance does not change at all when soaked, the problem is on the inside, which usually means a failed housing seal letting moisture in or a degraded reflector. Those need the assembly resealed or replaced. Deep cracking or crazing across the lens is also a replacement job, since sanding through it would leave the lens too thin.
Is a two-part clear coat from a body shop supply better than the wipes in a kit?
It is more durable, and considerably less forgiving. Two-part clear coat mixes a hardener in and cures to a tougher film that can outlast consumer wipes by a wide margin, which is why professional refinishers use it. In exchange you get a short working window once mixed, a real need for ventilation and respiratory protection because of the isocyanates involved, careful masking, and runs or orange peel if your technique is off. For a first restoration on your daily driver, a boxed kit with clear coat wipes is the sensible trade. Consider two-part only once you have done the job a few times and want to stretch the interval.
Or jump to the head-to-head: 3M Ultra Headlight Restoration Kit 39195 vs CERAKOTE Ceramic Headlight Restoration Kit.