

Tools & DIY
The Best Stud Finders: 4 Compared (and One to Skip)
We compared four stud finders on what each technology actually senses, what the maker's own manual says defeats it, and how honest each brand is about its limits.
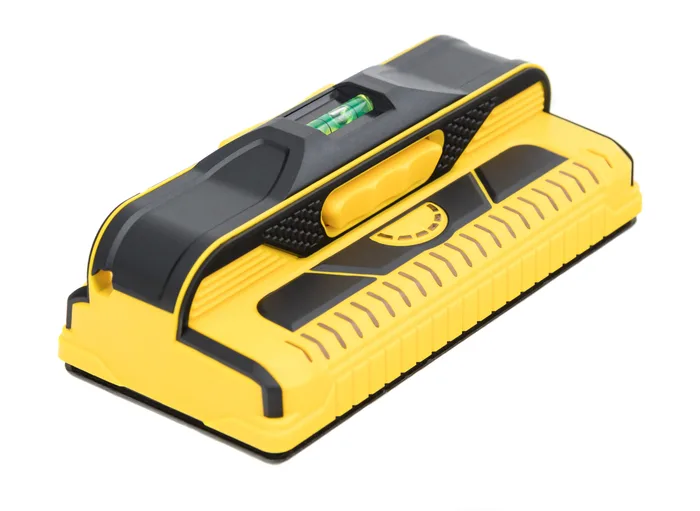
The short version
The Franklin Sensors ProSensor M210 is the one to buy for most people: 13 sensors read the wall at once, so you get the full width of the stud in one placement, and Franklin's instructions state that no calibration or tuning is required. The Kreg Magnetic Stud Finder is the value pick, a battery-free magnet that latches onto a drywall screw and hangs there hands free, which is all you need for hanging a shelf. The Bosch GMS120-27 suits the person who needs to know whether the thing behind the wall is wood, steel or a live conductor before they drill, and it is the only one of the four whose maker publishes a depth table by material. Skip the Walabot DIY 2 M: its own product page says to use it only on drywall and plywood and not on lath and plaster, concrete, tile, brick, metal backed walls or stucco, which rules out most of the walls where you would want extra help. Read the live wire feature on any of these as a warning, never as a survey, because the manuals say the tool may miss wires. Best for: anyone who wants to hit the middle of a stud on the first try without guessing.
Our picks at a glance
- Franklin Sensors ProSensor M210 - Buy. Thirteen sensors read the wall simultaneously and light up the full width of what is behind it, with no calibration step to get wrong.
- Kreg Magnetic Stud Finder (KMM1000) - Buy. Two rare earth magnets latch onto the screw or nail holding the board to the stud and hang there hands free while you mark.
- Bosch GMS120-27 Wall Scanner - It depends. Separate modes for wood, metal and live AC, with a published depth table by material and a marking ring that shows you where the centre is.
- Walabot DIY 2 M Wall Scanner - Skip. Radar imaging that draws studs, pipes and wires on your phone, restricted by its own maker to drywall and plywood.
The verdict in 30 seconds
What mattered most
- Sensing method
- What it actually detects
- Maker's depth figure
- Live wire indication
- Calibration
- Maker's position on lath and plaster
A stud finder does not see a stud. Capacitive tools sense a change in density behind the surface, magnetic tools stick to the nail or screw that holds the board on, and app-driven radar tools build a picture of whatever is close behind drywall. Each one fails in a different way, and the manuals say so in plain language that almost nobody reads. We picked four current tools that cover all three approaches and judged them mostly on what their makers admit they cannot do.
Thirteen sensors read the wall simultaneously and light up the full width of what is behind it, with no calibration step to get wrong.
Best for: Anyone hanging shelves, cabinets or a TV bracket on modern drywall who wants the whole stud shown at once.
- Franklin's instructions state that no calibration or tuning is required, which removes the single biggest source of user error with capacitive tools.
- The 21 LED strip shows the full width of a stud, so you can see double studs and odd framing rather than inferring a centre from two edge beeps.
- Franklin publishes a detection depth of 1.7 in and its manual is unusually candid about moisture, foil-backed insulation, metallic wallpaper and lath and plaster.
- The Live Wire Meter has no published detection depth, and the manual warns that the product may not detect all live wires or all hidden objects.
- Franklin says it does not recommend the M210 for tile, flooring, roofing or exterior surfaces because the density of those materials varies too much.
- The manual tells you to hold it only by the handle, because gripping the sides can make it read inaccurately, and to stay about 3 in away from trim, outlets and switches.
- It senses inconsistency and does not identify what kind, so pipes, wires and a patch of filler can all light the LEDs.
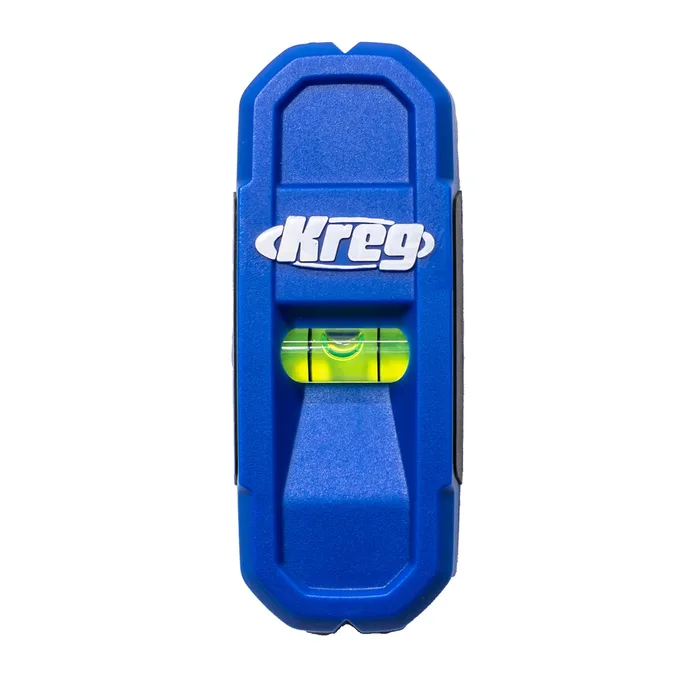
Two rare earth magnets latch onto the screw or nail holding the board to the stud and hang there hands free while you mark.
Best for: Homeowners who mostly need to hit framing for a shelf, curtain rail or picture, and would rather have a tool that never lies than one that guesses.
- No batteries, no calibration and nothing to interpret: it either sticks to a fastener or it does not.
- Kreg's own product answers give a real number, saying the magnets detect a fastener buried up to 0.150 in below the wall surface and that a typical drywall fastener sits roughly 0.035 in to 0.050 in deep.
- A hi-viz bubble level and centred marking notches let you find the fastener and draw the line in one step, and Kreg lists a three year limited warranty.
- It finds a fastener, not a stud, so it tells you nothing about stud width, which edge you are near, or whether the framing runs where you assume.
- Kreg's stated 0.150 in magnet reach is measured to the fastener head, so a skim coat, thick texture or a deeply set screw can put the target out of range.
- Nothing stops it latching onto a pipe strap, a corner bead, conduit or a nail plate, and it gives you no warning that it has.
- There is no live wire indication of any kind.
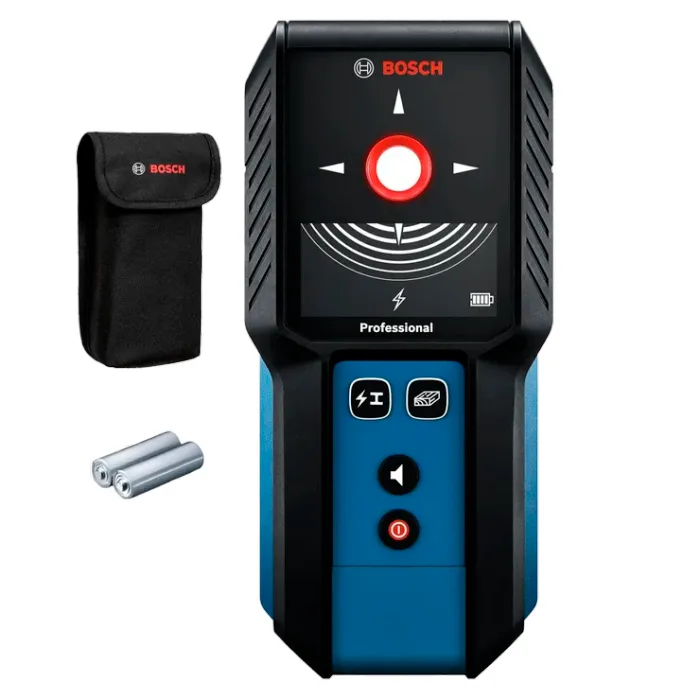
Separate modes for wood, metal and live AC, with a published depth table by material and a marking ring that shows you where the centre is.
Best for: Someone drilling into an unfamiliar wall who needs to know whether the target is wood, steel or a live conductor before the bit goes in.
- Bosch publishes maximum detection depths by material rather than one headline number, listing up to 2 in for copper wiring and 4 in (100 mm) for ferrous metals.
- Switching between a wood pass and a metal pass is the practical way to tell a stud from a pipe, and it is the approach Bosch's own instructions recommend for lath and plaster.
- It is built for a site, with an IP54 rating, a rubber casing, a weight of 0.64 lb, and the choice of the two supplied AA cells or a 3.7V Li-ion pack sold separately.
- Bosch's US specification table for this model does not publish a wood stud detection depth, only metal and wiring figures.
- Its own listed figures put non-ferrous copper deeper than ferrous steel, which reads like a labelling slip and is worth treating with caution.
- Bosch's wall scanner instructions are explicit that live wires cannot be detected with certainty behind metallised or conductive surfaces, inside metal conduit or where moisture is present.
- Multiple modes mean more to learn and more to get wrong than a tool that just lights up over a stud.
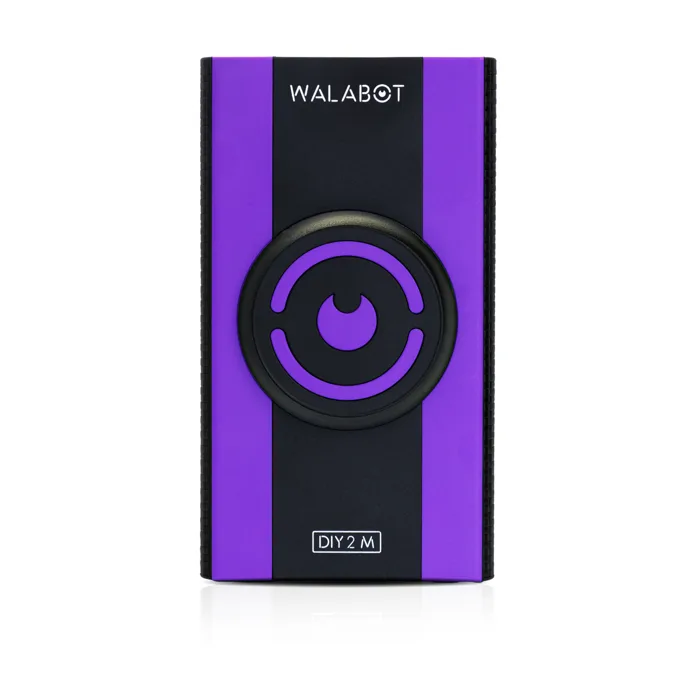
Radar imaging that draws studs, pipes and wires on your phone, restricted by its own maker to drywall and plywood.
Best for: A curious owner of a modern drywall house who genuinely wants a picture of the cavity and accepts the surface restriction.
- It shows an image rather than a beep, with an Image Mode for studs and pipes and an Expert Mode that displays the raw radar data.
- Walabot states detection of objects up to 4 in (10 cm) deep, further than any capacitive tool here claims.
- It has its own rechargeable battery and Wi-Fi link, so it does not drain the phone and can be used away from it.
- Walabot's own product page says to use it only on drywall and plywood, and not on lath and plaster, concrete, tiles, bricks, metal backed walls or stucco.
- That exclusion list removes most of the walls where a plain magnet or a two mode scanner would struggle, which is where the extra spend was supposed to earn its keep.
- It cannot be used without a paired iOS or Android phone and its app, so a dead handset or an app change takes the tool with it.
- You are reading a rendered picture of a radar return, which invites more confidence than a warning light does, without any published accuracy figure to back it.
| Criteria | ProSensor M210 Top pick | Magnetic Stud Finder (KMM1000) | GMS120-27 Wall Scanner | DIY 2 M Wall Scanner |
|---|---|---|---|---|
| Verdict | Buy it | Buy it | It depends | Skip it |
| Best for | Anyone hanging shelves, cabinets or a TV bracket on modern drywall who wants the whole stud shown at once. | Homeowners who mostly need to hit framing for a shelf, curtain rail or picture, and would rather have a tool that never lies than one that guesses. | Someone drilling into an unfamiliar wall who needs to know whether the target is wood, steel or a live conductor before the bit goes in. | A curious owner of a modern drywall house who genuinely wants a picture of the cavity and accepts the surface restriction. |
| Price tier | $$ · mid-range | $ · budget | $$$ · premium | $$$ · premium |
| Sensing method | Capacitive, 13 sensors read at once | Two rare earth magnets | Separate wood, metal and live AC modes | Radar imaging, drawn in a phone app |
| What it actually detects | A density inconsistency, type not identified | A ferrous fastener in the framing | Wood, ferrous and non-ferrous metal, live AC | Objects close behind drywall, shown as an image |
| Maker's depth figure | Up to 1.7 in | Fastener up to 0.150 in below the surface | Copper wiring up to 2 in; ferrous metals 4 in | Up to 4 in, drywall only |
| Live wire indication | Live Wire Meter, no depth published | None | Copper wiring up to 2 in | Wires shown in the app image |
| Calibration | None required, per Franklin's instructions | Not applicable, no electronics | Not stated on the product page | Not stated on the product page |
| Maker's position on lath and plaster | Works on many walls, no guarantee, mesh may block it | Not addressed; depends on how deep the fastener sits | Not addressed on the US product page | Explicitly told not to use it |
| Shows stud width | Yes, 21 LEDs across the full width | No, marks one fastener | Centre indication only | Yes, in the image view |
| Power | 2 AA alkaline | None | 2 AA supplied, or 3.7V Li-ion sold separately | Built-in rechargeable, USB Type C |
Which one is right for you?
- Anyone hanging shelves, cabinets or a TV bracket on modern drywall who wants the whole stud shown at once. Buy it Franklin Sensors ProSensor M210
- Homeowners who mostly need to hit framing for a shelf, curtain rail or picture, and would rather have a tool that never lies than one that guesses. Buy it Kreg Magnetic Stud Finder (KMM1000)
- Someone drilling into an unfamiliar wall who needs to know whether the target is wood, steel or a live conductor before the bit goes in. It depends Bosch GMS120-27 Wall Scanner
- A curious owner of a modern drywall house who genuinely wants a picture of the cavity and accepts the surface restriction. Skip it Walabot DIY 2 M Wall Scanner
How we judged the field
Five things decide whether a stud finder earns its place in a drawer. First, what it physically senses, because a capacitive tool responds to density and a magnet responds to steel, and those two failure modes have nothing in common. Second, whether the maker publishes a depth figure and qualifies it, since a headline number with no material caveat is marketing. Third, how the tool handles calibration, because a capacitive unit that takes its reference from the spot you switch it on at will give nonsense if that spot happens to be a stud. Fourth, what the maker admits about walls it cannot handle, which is where lath and plaster, metal mesh, tile, foil-backed insulation and metallic wallpaper all live. Fifth, how the live wire feature is described, because that is the one function people over-trust.
The field splits three ways and we took one from each, plus one that shows where the third approach breaks down. Capacitive multi-sensor tools are the mainstream: Franklin’s ProSensor M210 represents the best version of that idea because 13 sensors mean no calibration step and a full-width readout. Magnets are the cheap, simple alternative, and the Kreg KMM1000 is a clean example with a published magnet reach figure. Multi-mode scanners that separate wood, metal and live AC are the professional answer, and the Bosch GMS120-27 is the one whose maker publishes a depth table by material. Radar imaging is the newest pitch, and the Walabot DIY 2 M is where we let a manufacturer’s own surface restriction make the argument for us.
Franklin Sensors ProSensor M210
Buy itThe ProSensor M210 solves a problem most stud finders create. A single-sensor tool asks you to find one edge, then the other, then split the difference, and every one of those steps can be poisoned by a bad power-up. Franklin reads the surface in 13 places at once and lights the LEDs above whatever is denser, so the answer arrives in one placement, and the instructions state flatly that no calibration or tuning is required. Franklin publishes 1.7 in of detection depth and, more usefully, publishes what defeats it: moisture, wallpaper with metallic content, foil-backed insulation, and lath and plaster with metal mesh reinforcement. It is also blunt that it senses inconsistency and does not identify what kind, so a pipe near the surface lights up the same as a stud. The Live Wire Meter is optimised for wires on or near studs and carries no depth figure. Hold it by the handle, keep clear of trim and outlets, and it is the most repeatable tool here. For anyone hanging things on modern drywall, this is the one.
Kreg Magnetic Stud Finder (KMM1000)
Buy itThe Kreg magnet does one thing and refuses to pretend otherwise. Two rare earth magnets pull toward the screw or nail that fixes the board to the framing, and when they find one the tool hangs on the wall by itself while you mark through the centred notches or use the bubble level to run a line. There are no batteries, no calibration, nothing to warm up and no reading to second-guess. Kreg’s product answers put a real number on the limit, saying the magnets reach a fastener buried up to 0.150 in below the surface while a typical drywall fastener sits about 0.035 in to 0.050 in down, which is a narrow margin once you add a skim coat or heavy texture. The catch is conceptual rather than mechanical: it finds a fastener, not a stud, so you learn a point and not a width or a direction, and it will happily stick to conduit or a nail plate. For shelves, rails and pictures, that is enough tool.
Bosch GMS120-27 Wall Scanner
It dependsThe GMS120-27 is a different category of instrument, and whether you want one depends on what you are about to cut into. Instead of one reading it gives you three separate passes, for wood, for metal, and for live AC, and Bosch publishes maximum depths by material rather than a single number, listing up to 2 in for copper wiring and 4 in for ferrous metals. Running a metal pass and then a wood pass is the honest way to tell a stud from a pipe, and Bosch’s own instructions recommend exactly that for lath and plaster, where finding the nails that hold the lath is easier than finding the stud. It is site-built, IP54, and runs on the supplied AA cells or an optional Li-ion pack. Two caveats: the US specification table does not publish a wood stud depth, and its listed non-ferrous figure sits deeper than its ferrous one, which looks like a labelling slip. This is a tool for people who need to know what is there.
Walabot DIY 2 M Wall Scanner
Skip itThe Walabot DIY 2 M, which replaced the DIY 2 in Walabot’s shop with the same feature set, makes the most exciting promise in the category and its own product page undercuts it. Radar imaging, an on-device rechargeable battery, a Wi-Fi link to your phone, a picture of studs, pipes and wires rather than a beep, and a stated 4 in of depth. Then the same page says: only scanning drywall and plywood, and do not use on lath and plaster, concrete, tiles, bricks, metal backed walls or stucco. Walabot’s own support answer repeats that it is intended to be used on drywall. That restriction is the whole problem. On plain modern drywall a magnet costing a fraction of this will find your framing, and a multi-sensor tool will show you its width. The walls that make you wish for radar are precisely the ones on the exclusion list. Add the requirement for a paired phone and an app, and no published accuracy figure, and the case thins out. Interesting technology, wrong buy for most people.
Sources
Specs in this review come from these pages.
- Franklin Sensors ProSensor M210 operating and safety instructions (franklinsensors.com)
- Zircon StudSensor A100 instructions (uk.zircon.com)
- Bosch GMS120-27 wall scanner product specifications (boschtools.com)
- Bosch wall scanner operating and safety instructions (ocsmedia.boschtools.com)
- Walabot DIY 2 M product page (walabot.com)
- Kreg Magnetic Stud Finder KMM1000 product page (kregtool.com)
Franklin Sensors ProSensor M210 vs Kreg Magnetic Stud Finder (KMM1000): which should you buy?
The M210 and the Kreg magnet are not really competing for the same job, which is why we would happily own both. The Franklin tells you where the stud is and how wide it is, in one placement, with no calibration to fumble. That matters when you are mounting a heavy bracket and need two lags in the middle of the timber, or when the framing is not where standard spacing says it should be, or when there is a double stud beside an opening and a single-point tool would put you into the gap between them. It also warns you when something is dense that should not be, which is worth having before a long screw goes in.
The Kreg is the tool you reach for when you already know roughly where the stud is and you just want confirmation you can trust. Its virtue is that it has no interpretation layer: a magnet either grabs steel or it does not. If your house is post-war drywall over wood framing and your jobs are shelves and curtain rails, buy the magnet first and see whether you ever need more. If your walls are older, textured, skim-coated or unpredictable, or if you are drilling for anything structural, the M210 is the one that will save you a wasted hole. Use the magnet to confirm what the electronic tool told you, and treat any disagreement between them as a reason to scan at a different height before you drill.
What to look for
- Count the sensors: a single-sensor tool finds edges and asks you to infer the centre, while a multi-sensor array reads the wall in one placement and shows the full width, which removes most of the guesswork.
- Read the calibration line: if the manual tells you to hold the tool flat and press the button without moving it, the tool takes its reference from that spot, and starting over a stud will give you readings that make no sense.
- Check whether the depth figure is qualified: a good spec sheet gives depth by material and adds that sensing depth varies with mineral content, moisture, texture and the consistency of the wall, which is what both Bosch and Zircon do.
- Look for the exclusion list, not the feature list: tile, carpet, foil covered insulation board, metallic wallpaper, freshly painted or papered walls and lath and plaster all appear in manufacturers’ own not-designed-for lists.
- Treat live wire indication as a warning only: makers state it may miss wires behind metal, in conduit, where moisture is present, or when the circuit is not energised, and one manual notes the alert can spread 30 cm each side of the actual cable.
- Prefer a metal mode if your walls are old: the standard advice in Bosch’s own instructions for lath and plaster, thick flooring and drywall over plywood is to switch to metal detection and find the fasteners instead of the timber.
Our final take
Buy the tool that matches your walls, not the one with the biggest number on the box. On modern drywall, the Franklin ProSensor M210 removes the two things people get wrong with stud finders, the calibration and the edge-splitting, and it is candid in print about what defeats it. A Kreg magnet in the other pocket costs almost nothing and confirms the answer with a physical pull instead of a light. If you are drilling into a wall you do not know, the Bosch GMS120-27 buys you a wood pass, a metal pass and a live AC pass with published depths by material. Skip the Walabot DIY 2 M on the strength of its own surface restriction. Whichever you own, turn the power off before you drill.
Questions, answered
Does live wire detection mean I can safely drill?
No, and no maker claims it does. Franklin's M210 instructions say the product may not detect all live wires or all hidden objects and tell you to turn off electrical, gas and water supplies before penetrating a surface. Bosch's wall scanner instructions go further, warning that live conductors cannot be detected with certainty behind metallised or conductive surfaces, inside metal conduit, or where there is moisture, and that wires which are not live may show as metal objects or not show at all. Zircon's instructions carry a flat warning not to assume there are no live electrical wires in the wall and note that the voltage signal can spread across drywall by as much as 30 cm on each side of the wire. Treat the indicator as a reason to stop, not as evidence of a clear path.
Will a stud finder work on lath and plaster?
It depends on the tool and the wall, and the makers disagree in an informative way. Zircon states plainly that its basic StudSensor models with only StudScan and DeepScan modes are not recommended for lath and plaster because of irregularities in plaster thickness. Franklin says many users have success on lath and plaster, but adds that there is no guarantee and that metal mesh reinforcement may block detection entirely. Bosch's approach is the most practical: its instructions suggest switching to metal detection mode to find the nails holding the lath to the studs. If your plaster is reinforced with metal mesh, no capacitive tool is going to give you a clean answer.
Is a magnetic stud finder more reliable than an electronic one?
It is more honest, which is not quite the same thing. A magnet responds only to a ferrous fastener, so it cannot produce the density false positives that capacitive tools do. But Kreg's own product answers put the magnet's reach at up to 0.150 in below the wall surface, which is a shallow window: a skim coat, heavy texture or an overdriven screw can move the target out of range. It also finds one point rather than a stud, so it tells you nothing about the stud's width, direction, or which side of it you are on. Nothing prevents it latching onto conduit, a nail plate or a pipe strap either.
What does deep scan mode actually do?
It lowers the threshold rather than giving you a better picture, and Zircon says so in its own instructions. Zircon tells you to always start in StudScan mode, which reaches 19 mm, and warns that scanning in DeepScan mode, which reaches 38 mm, may detect an object further behind the wall that may or may not be a stud. Its guidance elsewhere is that DeepScan's increased sensitivity may pick up other things in walls that are not studs. So a deep mode is a genuine depth increase and a genuine increase in false positives at the same time. Use it when the standard mode finds nothing, then confirm by scanning the same spot at several different heights.
Why does my stud finder read differently every time I switch it on?
Most capacitive tools take a reference reading from whatever is under them at power-up, so where you start matters. Zircon's instructions tell you to hold the tool flat against the wall, press and hold the power button, and not move it during calibration, and its troubleshooting table lists calibrating over a stud as the cause when the ready icon appears but nothing happens during the scan, or when DeepScan finds nothing. The fix is to move the tool and start again. Franklin's design sidesteps this: its instructions state that no calibration or tuning is required because 13 sensors read the surface simultaneously. Also keep your other hand off the wall, since both Bosch and Zircon warn that touching the scanned surface can affect the reading.
Deciding between the top two? See our head-to-head: Franklin Sensors ProSensor M210 vs Kreg Magnetic Stud Finder (KMM1000).
More Tools & DIY reviews
 The Best Table Saws: 4 Compared (and One to Skip)
  The Best Tape Measures: 4 Compared (and One to Skip)
  The Best Thermal Imaging Cameras: 4 Compared (and One to Skip)
  The Best Torque Screwdrivers: 4 Compared (and One to Skip)
  The Best Utility Knives: 4 Compared (and One to Skip)
  The Best Welding Gloves: 4 Compared (and One to Skip)