Explained
Cable Management Kits, Explained
After reading this you will know which type of cable product solves your specific mess, and why the mounting method matters more than anything printed on the box.
In this guide
Desk cable management looks like one product category but it is really four: trays that hold weight, raceways that cover a visible run, sleeves that bundle a group of cables, and spines that carry cables to the floor on a desk that moves. Buyers usually pick by looks and price, then discover the real variable is how the thing attaches to the desk. Almost every complaint in this category traces back to adhesive tape asked to bond to the underside of a desk, which is typically raw, dusty, unfinished particleboard.
The 30-second version
- Mounting method is the whole decision. Screws or a clamp hold on any desk material. Tape holds only on smooth, sealed, clean surfaces, and most desk undersides are none of those things.
- Trays, raceways and sleeves are not interchangeable. A tray carries the power strip and adapter bricks, a raceway covers a visible run along a wall or leg, and a sleeve gathers a bundle that travels together.
- A sit-stand desk adds a second problem. Hiding the power strip is only half the job. Cables running from the desk to the floor need deliberate slack and a defined path, which is what a spine or vertebrae chain provides.
- Weight rating matters more than length. A surge protector plus two laptop adapters is heavier than people expect, and a rating in the region of eleven pounds is the common, adequate figure for an under-desk tray.
- Buy the boring metal thing first. A plain screw-mounted steel tray solves the majority of the visible mess and stops needing attention, which is more than most all-in-one kits manage.
The products this guide is about
Our verdict on each, with the full reasoning on the companion review.
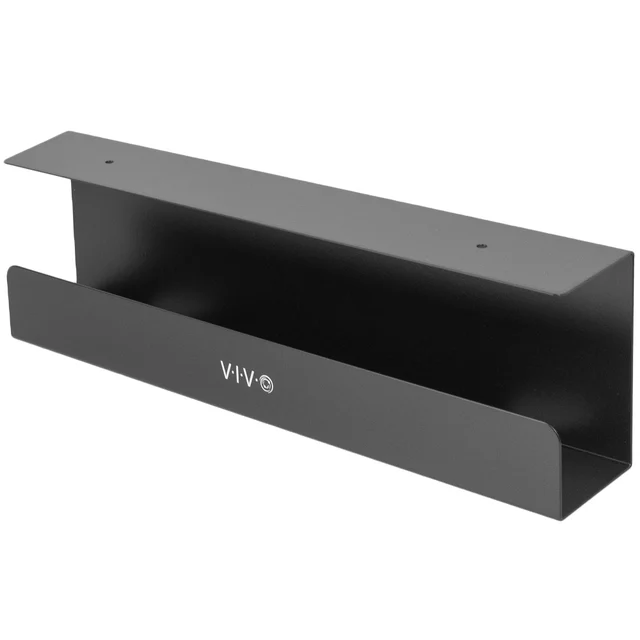
- Buy VIVO Under Desk Cable Management Tray (DESK-AC06-1C) A plain steel tray that screws into the desk and stops being a problem, which is most of what this category needs to do. Amazon
- Buy Ergonofis Cable Management Spine The one product here actually engineered for a desk that moves, and the reason standing desk owners stop re-taping clips every month.
- It depends StarTech.com Under Desk Cable Management Tray (UDCMTRAY) A longer version of the same screw-mounted tray idea, worth the premium only if you need the extra span. Amazon
- Skip Yecaye 94in J Channel Cable Raceway Tidy on a smooth lacquered surface, and the single most common thing owners report peeling off a raw desk underside.
What actually matters
- Mounting method (screw, clamp or adhesive). Screws bite into wood, MDF and particleboard and do not care about surface finish. Clamps grip the desktop edge with no drilling, which is the right answer for glass, metal or a rented desk. Adhesive is the only method that depends on a surface you cannot change, and the desk underside is close to the worst case for it.
- Screw length versus desktop thickness. Measure the panel and choose screws shorter than it. A screw that punches through the top surface is the one mistake here you cannot undo, and a small pilot hole stops particleboard swelling around the thread.
- Load rating, not just dimensions. Anything meant to hold a surge protector needs a stated weight capacity. A product that advertises length and finish but goes vague on capacity is telling you it is a cable guide, not a shelf.
- Tray depth for power bricks. Wall-wart adapters and laptop bricks are tall. A shallow tray leaves them sitting proud of the lip where they are still visible and still catch cables, so check depth as carefully as length.
- Open channel versus closed box. You will add a cable next month. An open-top or open-side design lets you drop one in without unthreading the whole bundle, which is worth more day to day than a fully sealed look.
- A plan for the floor drop on a height-adjustable desk. A static tray cannot stop cables being pulled tight at standing height or pooling on the floor at sitting height. Budget for a spine, vertebrae chain or sleeve from the start rather than discovering the need after the first week.
- Separating power from data. Power bricks and their cords belong in the tray. Long data runs, monitor cables and network cable are happier in their own sleeve or channel, which keeps heat out of a tight bundle and keeps the noisy stuff away from signal cable.
The specs, in plain English
Green flags vs red flags
Green flags
- The mounting hardware is screws or a clamp, and the listing shows the holes or the jaw
- A specific weight rating is stated rather than a vague claim about strength
- The tray is deep enough to swallow a tall adapter brick, not just wide enough to look tidy
- Open channel or open top design, so a cable can be added later without unthreading the bundle
- For a sit-stand desk, the product explicitly describes flexing through the full height travel
- Warranty coverage is stated in years rather than left unmentioned
Red flags
- Adhesive is the only mounting method offered and there is no screw or clamp option
- The instructions ask for multiple rows of tape and a long cure before loading, which is a maker telling you the bond is marginal
- Capacity is described only as heavy duty with no figure attached
- Product photos show a bare cable run with no power strip in the tray, which usually means it cannot carry one
- An all-in-one kit priced like a bargain where every component in the load path is taped
- Nothing in the listing addresses height-adjustable desks, in a kit being marketed at standing desk owners
Who's who: the brands
- VIVO - High-volume desk accessory maker whose plain screw-mounted steel trays are the default cheap answer, and the pick in our comparison.
- StarTech.com - Business and IT channel brand, so their trays turn up on corporate approved-supplier lists. Longer spans at a premium over budget equivalents.
- Ergonofis - Premium Canadian desk maker. Their cable spine is one of the few products engineered around sit-stand travel rather than adapted to it.
- Mount-It! - Mounting hardware specialist with clamp-on trays, which is the useful option when you cannot drill into a glass, metal or rented desktop.
- D-Line - Known for raceways and trunking. Their surface channels are the tidy answer for a visible wall or leg run rather than for holding a power strip.
- Yecaye - Budget adhesive raceway and J channel kits. Fine on a smooth sealed surface, and the style of product owners most often report peeling off a raw desk underside.
How to read a listing without getting fooled
Start at the mounting section, not the photo. If the listing leads with peel and stick, no drilling or damage free, read that as the specification it is: this product needs a smooth, sealed, clean surface, and your desk underside probably is not one. Next find a number for capacity. Trays that carry a power strip say so in pounds; guides that only route cables tend to talk about how many cords fit instead, which is a different job. Check depth as well as length, because a listing will lead with a long span while burying a shallow profile that leaves adapter bricks sticking out. Photos are useful for one thing: look at what is actually in the tray. Renders showing three neat identical cables are hiding the real load, which is a surge protector and two fat bricks. Finally, if you have a height-adjustable desk, search the page for any mention of it. Products designed for the travel say so plainly. Silence means the maker was thinking about a fixed desk, and the movement will find the weakest joint in a few weeks.
How much should you spend?
This is one of the rare categories where the cheap answer is also the right one. A plain screw-mounted steel tray costs very little and does the single most valuable thing available here, which is holding the power strip and adapters mechanically on any desk material. Spending more on a longer, better-finished tray buys span and a nicer finish, both real but neither changing the outcome; it is worth it on a wide desk, or when you are buying through a business channel that stocks the premium brands and not the budget ones. The one place a genuine premium is justified is a sit-stand desk, where a purpose-built spine costs several times a tray and is the only thing solving a problem a tray cannot touch. Spend the least on the tray, spend properly on the spine if your desk moves, and treat any expensive all-in-one kit that mounts with tape as worse value than the cheapest thing that takes two screws. Prices in this category also swing hard around retail sale events, so a mid-tier tray is often available at budget-tier money if you are not in a hurry.
Questions, answered
Will screws ruin a particleboard or MDF desk?
No, provided you get the length right. Short wood screws into the underside of a particleboard or MDF top hold a tray and its load well, and the marks are on a face nobody looks at. The failure to avoid is a screw longer than the panel is thick, which pops through the desktop surface. Measure the panel, pick screws shorter than that, and drill a small pilot hole so the board does not swell around the thread. Particleboard does not enjoy being re-screwed in the same spot repeatedly, so decide on the tray position before you drill.
Do adhesive kits ever hold?
Yes, on the right surface. Owner reports are consistent that adhesive clips, trays and channels stay put on smooth painted, lacquered, laminate or metal undersides, and let go on textured, unfinished or bare particleboard. Since most desk undersides are the second kind, tape is a gamble you do not need to take when a screw-mounted tray costs about the same. If you do use adhesive, clean the surface with isopropyl alcohol first, press hard along the whole strip, and leave it a full day before loading. Expect residue to scrape off if it ever fails.
Do I need a tray, a raceway and a sleeve, or just one of them?
Usually just a tray, at least to start. The tray hides the power strip and the adapter bricks, which is the bulk of what people are actually looking at. A raceway earns its place only on a visible run where you want a cover, such as along a wall or down an exposed desk leg. A sleeve is for a group of cables that travel the same path and that you want to read as one line. Buying all three for the same span mostly duplicates work and costs more than the problem is worth.
What changes on a standing desk?
Everything moves, several times a day. A static tray still does its job, but the cables running from the desk to the floor now need a service loop, meaning deliberate slack, and a defined path so they extend cleanly instead of stretching tight at standing height and pooling on the floor when you sit. That is what a spine or vertebrae chain is for. Adhesive parts also fail noticeably faster on a moving desk, because every height change works at the bond. Set the desk to full standing height when you measure the drop, then check the loop extends without any cable pulling on a port.
Can I do this without drilling into my desk?
Yes, and the right answer is a clamp, not tape. Clamp-mounted trays grip the desktop edge or underside and hold a real load without a single hole, which makes them the correct choice for glass, metal, a rental, or any desk you are unwilling to mark. Check the clamp's stated jaw range against your desktop thickness before buying, since a clamp that will not close on your desk is a returned item. Tape is the fallback only on a smooth, sealed, stationary surface.
What is the right order to install a kit?
Unplug everything and pull the desk away from the wall so you can get underneath it. Mount the tray, put the surge protector in it, then plug devices back in one at a time, routing each cable before you connect the next. Leave a loop of slack at every device so you can move a monitor later without redoing the whole run. Keep power bricks in the tray and long data cables in their own path rather than crushed into one hot bundle. If the desk is height adjustable, set it to full standing height while you measure the drop to the floor, then fit the spine or chain to that length.
Or jump to the head-to-head: VIVO Under Desk Cable Management Tray (DESK-AC06-1C) vs Ergonofis Cable Management Spine.